
How to Add Elevation to Your Arizona Backyard With Walls, Steps & Planters

Why So Many East Valley Backyards Feel Flat
Most of the backyards I walk into in Gilbert, Chandler, Mesa, and Queen Creek start out as a flat rectangle. The builder graded the lot level so water drains away from the house, put a block wall around the edges, and handed over the keys.
That's a practical starting point, but it's also why a yard can have nice plants, good furniture, and a fresh patio and still feel like something is missing. When everything sits at the same height, your eye takes in the whole yard at once and has nowhere to land.
The fix usually isn't more stuff. It's elevation. Changing the height of a few elements is one of the most effective design tools I use, and on a flat lot, it's often the difference between a yard that looks finished and one that looks like it's waiting for the next phase.
In this article I'll walk through how elevation changes the way a yard feels, the methods I use most to add it, when a retaining wall actually makes sense, and what each option typically costs.

How Elevation Adds Visual Interest
A flat yard reads as one plane. Once you add a few changes in height, the eye starts moving through layers instead of scanning straight across, and the space feels larger and more intentional.
Elevation does a few specific jobs in a design:
Creates focal points. A raised planter with a specimen tree or a seat wall wrapped around a fire pit gives the eye a place to stop.
Defines rooms. A step up to a dining patio or a low wall beside a lounge area separates spaces without fences or dividers.
Adds a sense of enclosure. Height around a seating area makes it feel tucked in and comfortable, the way a booth feels different from an open table.
Makes small yards feel bigger. When you can't add square footage, using vertical space is how you add interest.
With that in mind, the goal isn't to make a yard look hilly. It's to add enough variation that the design has depth, usually with two or three height changes that relate to how you actually use the space.
8 Ways I Add Elevation and Depth to a Flat Yard
1. Seat Walls (Seat Benches)
Seat benches, also called seat walls, are fairly common and easy to fit into most backyard or even front courtyard designs. A low wall around a fire pit, along the edge of a patio, or beside a spa adds height and extra seating at the same time, which means fewer chairs to buy and store.
I build most seat benches at a comfortable sitting height, which is typically about 18 inches tall and 16 inches wide. Most have a smooth cap on top, often travertine or natural stone, and we finish the face to match the house or other accents in the yard: stucco, stacked stone, tile, or a veneer. Built-in step lights or under-cap lighting turn them into a nighttime feature too.

2. Raised Planters
A raised planter lifts plants closer to eye level, which makes even a simple agave or a small tree read as a design element instead of ground cover. In a modern yard, I often use clean-lined planters finished in smooth stucco or set freestanding planter boxes over turf or pavers.
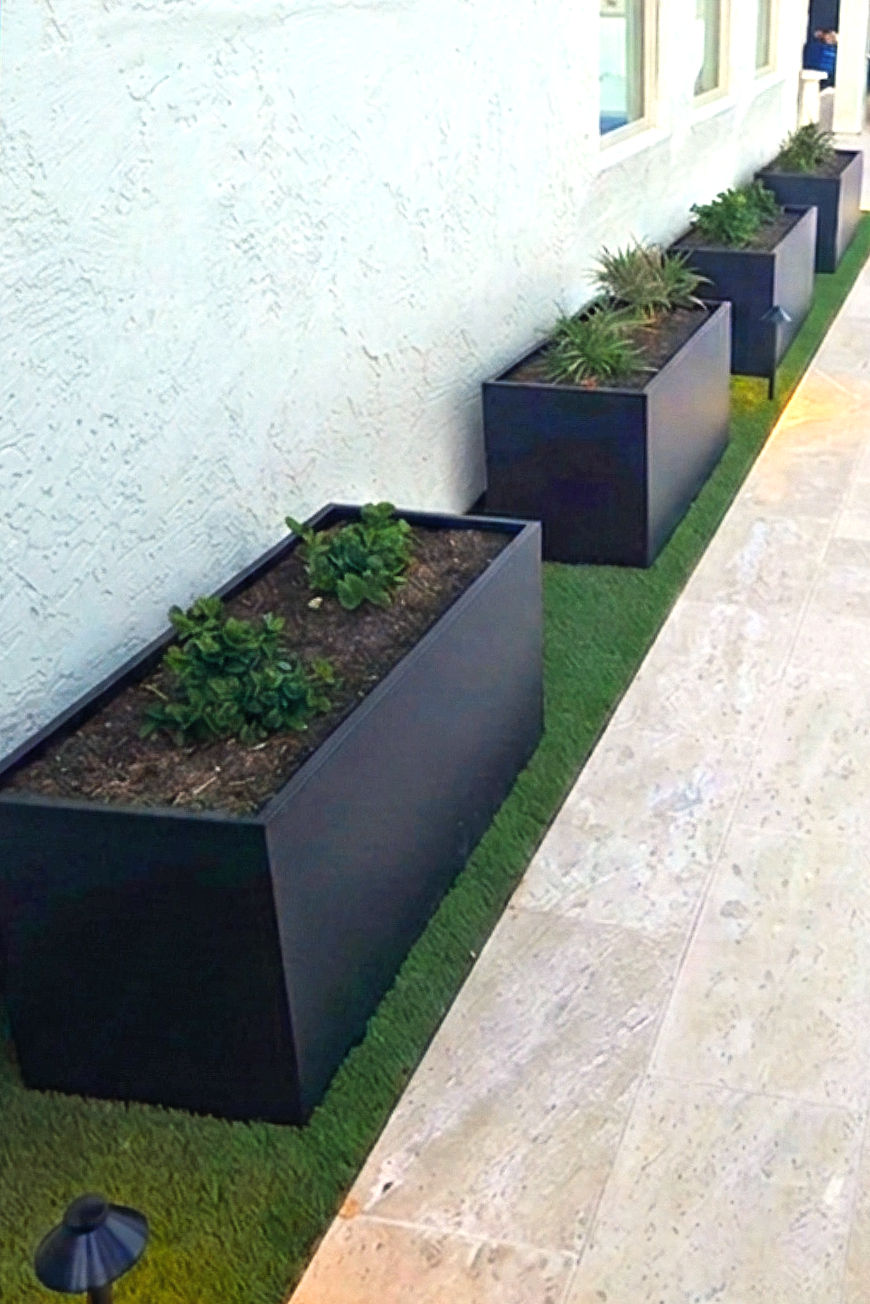
Raised planters also help with practical problems. They give plants better soil than the caliche most East Valley yards sit on, and they keep plantings contained so they don't spread into walkways. They work well in both small and oversized yards, as long as the scale is appropriate for the space.
3. Steps Up and Down With Pavers, Stone, or Composite Decking
This is where most modern elevation changes happen now. Rather than building one large flat patio, I'll step a dining area up a level from the lounge area, or drop a fire pit space down a few steps. Each level reads as its own room.
There are a few different options for this. Many of my clients prefer pavers because they're easier to shape into steps and multiple levels, and they can be lifted and reset if a repair is ever needed. However, we've also used natural stone or even composite wood options like Trex to create steps to higher and lower tiers. It all depends on the style of the space and the materials that work best with the design.
In the project featured below, we remodeled this backyard for a wedding reception our clients were hosting. The raised chessboard was created out of alternating large-format pavers, while the steps up and the small wall surrounding it were done in natural stone to fit the Tuscan style of the home and property. The elevated space was used as a dance floor during the reception and remains an attention-grabber whenever new guests visit.

4. Raised Patios and Decking
A raised patio is a bigger version of the same idea. Lifting the main entertaining area even one or two steps above the rest of the yard creates a clear stage for the space and improves the view across the yard from where you're sitting.
This works especially well on lots where the house sits slightly higher than the yard. It can also solve an awkward transition at the back door.
5. Water Features With Height
Water features are a natural way to add height because the water needs somewhere to fall. A raised basin, a scupper spilling from a wall, or a spillway built into a planter adds both a vertical element and sound. I cover the options in more detail in my guide to water features in desert landscapes.

6. Trellises, Pergolas, and Trees
Not every vertical element has to be built from block. A trellis along a bare wall with a vine trained up it adds height and softens the perimeter, and it's one of the least expensive ways to break up a flat view. Shade structures and trees do the same at a larger scale. If you're weighing options for overhead structures, I break down the differences in pergola vs. ramada.
7. Go Below Ground Level
Elevation doesn't only go upward. Dropping a space below the rest of the yard adds just as much dimension, and we've used it on countless projects.
Sunken fire pit lounges are the most popular version. A fire pit set a few steps down and wrapped in built-in bench seating feels tucked in and private, even in an open yard. A small sunken patio does the same thing for a quiet seating area. I cover fire pit sizing and placement in creating the perfect outdoor gathering space.

On pool projects, I'll sometimes sink an outdoor kitchen beside the pool so the bar counter sits at the water's edge. Swimmers pull up to a swim-up bar from the pool while the person cooking works at a normal height on the other side. Any space set below grade needs a plan for where the water goes, so I design drainage into every sunken area from the start.
8. Match the Yard's Levels to the Pool
Pools are one of the best places to use elevation because the pool already has its own levels: the deck, the waterline, a raised spa, sometimes a raised beam or water feature wall. Over the years we've worked on scores of pool hardscaping projects where the levels of the yard were designed to step with the levels of the pool.
In the Mesa project featured below, we worked with the pool company to design an outdoor space that has visual interest and works with the elevated back end of the lot. Since the back wall is higher than the other walls on the lot, we needed a way to add tiers and gradually raise the levels toward the back of the property without the space looking awkward or out of place.
As a result, this backyard has more than seven different levels, but they flow together so naturally that the design looks intentional rather than like an afterthought. When the homeowners step out their back patio doors, they're on the main patio level, where they can head to the outdoor kitchen or enter the front side of the pool. Three steps down puts them in a sunken fire pit area, and two steps up takes them to the spa. On the back side of the pool, we designed tiered grassy areas in place of berms, which step up to the landing for the waterslide.
When the yard and the pool relate to each other, the whole space reads as one design instead of a pool dropped into a backyard.
While this project is more complex than most, the point is that there are numerous ways to add elevation changes that give any yard depth, height, and visual interest.
For more on integrating spas like the one shown below, see our spa and hot tub hardscapes page.


What About Berms?
Berms, the mounded areas of soil you often see planted with cactus and boulders, still have a place, especially in desert front yards. They aren't usually part of a modern design, though. For a clean, contemporary look, I add elevation through steps, walls, and planters rather than mounding dirt.
When Steps Do More Than Look Good: Built-In Water Retention
Some properties are required to hold and drain their own stormwater on the lot instead of sending it to the street. If that's your situation, it can feel like a chunk of your yard is being taken over by a drainage requirement. It doesn't have to be.
On these properties, one of the best ways to keep the space usable is to make it multifunctional.
As in the project featured below, I design a lower area of the yard as the retention space and use steps and elevation changes to lead down to it. When a heavy monsoon storm hits, water collects in that lower area and drains out over time instead of pooling against the house or the patio.
The rest of the year, that same space works as a usable part of the yard. A grassy retention area makes a good field for soccer, volleyball, or any game that needs open, flat space. For families with kids, it often becomes the most-used part of the backyard. If you're planning a play space, I cover more options in my guide to selecting a sport court or play area.
The steps down to it look like a style choice, and that's the point. Guests see a nicely tiered yard. You know it's also doing a job every monsoon season.

When a Retaining Wall Makes Sense
On a typical flat East Valley lot, you rarely need a true retaining wall. Most of the walls I build there are seat walls and planter walls, which are decorative and don't hold back significant soil.
That changes in parts of the Valley with real grade changes. Properties in Scottsdale, Ahwatukee, Apache Junction, and other lots near the foothills and mountain preserves often have slopes that make part of the yard hard to use. A retaining wall holds the soil back so you can level that ground and turn it into a patio, a planting terrace, or a play area.
Retaining walls are structural, so they're built differently than a seat wall. They need a proper footing, reinforcement, and drainage behind the wall so water pressure doesn't push it over during a monsoon storm. Taller walls typically need a permit and sometimes an engineer's sign-off, so plan for that, especially if you're considering full perimeter walls.
On a sloped lot, a series of shorter terraced walls often works better than one tall wall. Each level becomes a usable space, and the result looks like a design choice rather than a barrier. The Ahwatukee front yard featured below is one example.


What Adding Elevation Costs
The cost of adding elevation changes to a yard varies widely. A simple block wall is very different from one finished with natural stone, drainage systems, and custom built-in lighting. The prices below are wide ranges because materials, finish, height, grading, and drainage all affect the final cost.
These are the ranges I see on typical East Valley projects:
Feature | Typical cost range | What affects the price |
Seat walls | $85-$200 per linear foot | Width, finish (stucco, stone veneer), cap material, built-in lighting |
Raised planters | $12-$400 per linear foot | Size, finish, freestanding vs. built-in |
Paver steps and level changes | $12-$50 per linear foot | Paver size and type, number of steps, base prep, built-in lighting |
Retaining walls | $12-$400 per linear foot | Height, engineering, permits, drainage |
Trellis with vines | $300-$400 | Material (metal, wood), size, finish (raw, painted, or powder coated), plant size and type |
For a full picture of how these fit into a larger project, my backyard remodel cost guide breaks down pricing for complete remodels.
David's Two Cents: Every time you change the height of something in a yard, you change where the water goes. I plan the drainage first and the elevation second. A raised patio that sends monsoon runoff toward your back door isn't a design upgrade. It's a design disaster.
Frequently Asked Questions (FAQ)
1. What's the cheapest way to add elevation to a flat backyard? A trellis with vines or a few raised planters. Both add height for a fraction of the cost of walls or a raised patio.
2. What's the difference between a seat wall and a retaining wall? A seat wall is decorative and built for sitting. A retaining wall is structural and holds back soil on a slope, so it needs a stronger footing, reinforcement, and drainage.
3. Do I need a permit for a retaining wall? Taller retaining walls usually do, but each city and county has different requirements, so check with your jurisdiction before construction begins.
4. Are pavers or poured concrete better for steps and level changes? I recommend pavers for most projects. They're easier to shape into multiple levels, and individual pavers can be reset if a repair is needed.
5. Will adding elevation cause drainage problems? It can if it isn't planned. I design the drainage before adding any height so water moves away from the house and patios.
6. Can a retention area really be used as part of the yard? Yes. With grass and steps leading down to it, a retention area can work as a play space for most of the year and only holds water after heavy storms.
7. Can you add depth by going below ground level? Yes. Sunken fire pit lounges, sunken patios, and sunken outdoor kitchens beside a pool are some of the most popular ways we add dimension. Each one needs drainage planned into it from the start.

Ready to Give Your Flat Yard Some Depth?
If your backyard feels flat and you're not sure where to start, a design consultation is the easiest first step. I'll walk your lot with you, look at how water moves across it, and show you where a few changes in height would make the biggest difference for the way your family uses the space.


